Accidents happen, and sometimes, they leave behind unsightly holes in your walls. Whether it's a doorknob that left a dent or an unexpected mishap, knowing how to fix a hole in the wall is an essential skill for every homeowner. The good news is that repairing a hole is often easier and more affordable than you might think. With the right tools, techniques, and a little patience, you can restore your wall to its original condition in no time.
From small nail punctures to larger gaping holes, each type of wall damage demands a slightly different approach. This guide will walk you through step-by-step methods for addressing these issues, ensuring a seamless repair that blends perfectly with the rest of your wall. Not only will you save money by doing it yourself, but you'll also gain the satisfaction of mastering a practical home improvement skill.
In this comprehensive article, we’ll cover everything you need to know about repairing wall damage. Whether you’re a seasoned DIY enthusiast or tackling your first home repair project, this guide will provide insightful tips and answers to common questions, ensuring you feel confident every step of the way. Let’s dive into the nitty-gritty details of how to fix a hole in the wall and restore your space to perfection!
Table of Contents
- What Causes Holes in Walls?
- Tools and Materials Needed to Fix a Wall
- How to Identify the Type of Wall Damage?
- How to Fix Small Holes in the Wall?
- What to Do with Medium-Sized Holes?
- Repairing Large Holes in the Wall
- How to Blend the Repair with the Wall?
- How to Paint Over Repaired Holes?
- How to Prevent Future Wall Damage?
- Common Mistakes to Avoid When Fixing Walls
- How to Fix a Hole in Drywall?
- How to Repair Plaster Walls
- Can You Hire a Professional to Fix Wall Damage?
- How Long Does It Take to Fix a Hole in the Wall?
- Frequently Asked Questions About Wall Repairs
What Causes Holes in Walls?
Understanding what causes holes in walls is the first step toward effective repair. The most common culprits include accidental impacts, such as furniture bumps, doorknob collisions, or even unruly pets. In some cases, intentional installations, like nails or screws for hanging decorations, can also leave behind damage.
Environmental factors can also contribute to wall damage. Humidity, poor construction quality, or aging materials can weaken the structure, making it more susceptible to holes. Identifying the cause of the damage helps you choose the best repair method and prevent future issues.
Tools and Materials Needed to Fix a Wall
Before diving into the repair process, it’s important to gather the necessary tools and materials. Here’s a checklist of essentials:
- Spackle or joint compound
- Putty knife
- Sandpaper (fine-grit)
- Drywall patch or mesh tape
- Utility knife
- Paint and primer
- Paintbrush or roller
- Measuring tape
Having these items on hand will make the repair process smoother and more efficient, ensuring your wall looks as good as new.
How to Identify the Type of Wall Damage?
Not all wall damage is created equal. To fix a hole in the wall properly, you need to identify the type and extent of the damage. Is it a small nail hole, a medium-sized dent, or a large gaping hole? Each scenario requires a unique approach, and understanding the scale of the problem ensures you choose the right tools and techniques.
For minor damage, lightweight spackle is often sufficient. For larger holes, you'll need a drywall patch and possibly some reinforcement. Take a close look at the wall material as well—drywall and plaster have different repair requirements.
How to Fix Small Holes in the Wall?
Small holes, like those left by nails or push pins, are the easiest to fix. Follow these steps to repair them:
- Clean the area around the hole to remove dust and debris.
- Apply a small amount of spackle or lightweight joint compound with a putty knife.
- Spread the compound evenly, ensuring it fills the hole completely.
- Allow it to dry as per the manufacturer’s instructions.
- Sand the area lightly to make it smooth and flush with the wall.
- Prime and paint over the repaired spot to match the wall color.
With these simple steps, your wall will look as though the hole never existed!
What to Do with Medium-Sized Holes?
Medium-sized holes, such as those caused by doorknobs or accidental impacts, need a bit more attention. Here’s how to address them:
- Cut a piece of drywall patch or mesh tape slightly larger than the hole.
- Secure the patch over the hole using drywall adhesive or screws.
- Apply joint compound over the patch, smoothing it out with a putty knife.
- Let the compound dry completely before sanding it down for a smooth finish.
- Prime and paint the area to blend it with the surrounding wall.
Taking the time to properly patch and blend ensures a professional-looking repair.
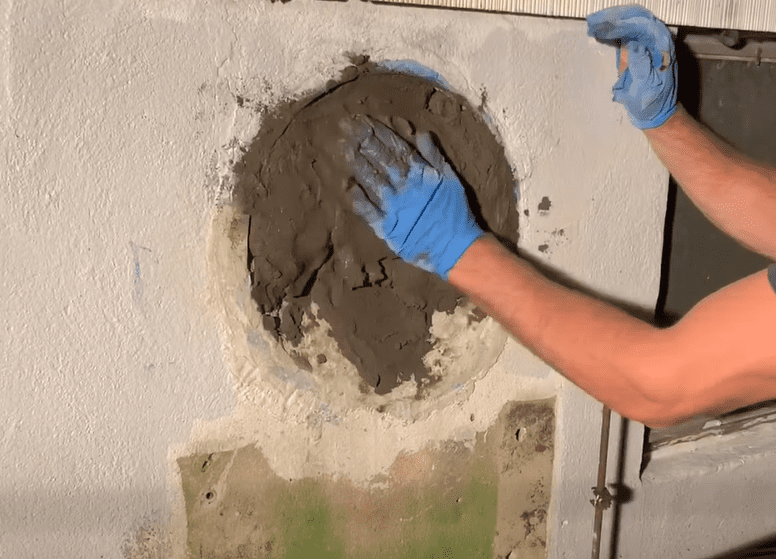
Repairing Large Holes in the Wall
Large holes, often caused by accidents or structural issues, require more extensive repairs. In most cases, you’ll need to replace a portion of the drywall. Follow these steps:
- Cut out the damaged section of the wall to create a clean, square opening.
- Measure and cut a new piece of drywall to fit the opening.
- Attach the new drywall piece using screws or adhesive, securing it to the wall studs.
- Tape the seams with drywall tape and cover them with joint compound.
- Sand the area smooth once the compound has dried.
- Prime and paint the repaired section for a flawless finish.
This method ensures a sturdy and long-lasting repair that blends seamlessly with the rest of the wall.
How to Blend the Repair with the Wall?
Blending the repaired area with the rest of the wall is crucial for a polished look. After sanding the repaired section, make sure to use a primer that matches the existing wall texture. If your wall has a specific pattern, like an orange peel or knockdown texture, consider using a texture spray to replicate it.
Once the primer is dry, apply a coat of paint that matches the wall color. For the best results, use the same type of paint (e.g., matte, eggshell, or semi-gloss) to ensure uniformity.
How to Paint Over Repaired Holes?
Painting over repaired holes is the final step in achieving a flawless finish. Here’s how you can do it:
- Start by applying a primer to the repaired area to prevent paint absorption.
- Choose a paint color that matches the rest of the wall.
- Use a paintbrush or roller to apply the paint evenly over the primer.
- Let the first coat dry, then apply a second coat if necessary for full coverage.
With proper technique, the repaired area will be virtually indistinguishable from the rest of the wall.
How to Prevent Future Wall Damage?
Preventing future wall damage saves you time and effort in the long run. Here are some tips:
- Install doorstops to prevent doorknob dents.
- Use adhesive hooks instead of nails for lightweight decorations.
- Reinforce weak areas with additional support, such as plywood backing.
By taking these precautions, you can minimize the risk of accidental wall damage in the future.
Common Mistakes to Avoid When Fixing Walls
Even with the best intentions, mistakes can happen during wall repairs. Avoid these common pitfalls:
- Skipping the sanding step, which can leave the repair uneven.
- Using the wrong type of compound or patch for the damage.
- Failing to prime the repaired area before painting.
By steering clear of these errors, you can ensure a professional-quality repair every time.
How to Fix a Hole in Drywall?
Fixing a hole in drywall is a straightforward process. Follow the steps outlined earlier in this guide to repair small, medium, or large holes effectively. Remember to use the right materials and techniques for the best results.
How to Repair Plaster Walls
Repairing plaster walls is similar to fixing drywall but requires a slightly different approach. Use a plaster patching compound and apply it in layers, allowing each layer to dry before adding the next. Sand the final layer smooth and paint over it to match the wall.
Can You Hire a Professional to Fix Wall Damage?
While DIY repairs are cost-effective, hiring a professional can save time and ensure a flawless finish. Professionals have the expertise to handle complex repairs, such as structural damage or intricate textures, giving you peace of mind.
How Long Does It Take to Fix a Hole in the Wall?
The time required to fix a hole in the wall depends on the size and complexity of the damage. Small holes can be repaired in under an hour, while larger repairs may take several hours or even a couple of days, including drying and painting time.
Frequently Asked Questions About Wall Repairs
Have more questions about how to fix a hole in the wall? Here are some common queries:
- Can I use toothpaste to fill small holes? While toothpaste can be a quick fix, it’s not a durable solution. Use spackle for a long-lasting repair.
- Do I need special tools for textured walls? Yes, a texture spray or sponge can help replicate the wall’s original texture.
- How soon can I repaint after repairing? Wait for the compound and primer to dry completely before painting, which can take 24-48 hours.
By following this comprehensive guide, you’ll not only learn how to fix a hole in the wall but also gain the confidence to tackle future home improvement projects with ease.
You Might Also Like
Discover The Enchanting Beauty Of Grand Bahama: A Caribbean ParadiseUncovering The Power Of Facebook Highlights: A Complete Guide
Discover The Enchanting World Of Dart Frogs: Nature's Tiny Jewel
The Comprehensive Guide To Mold Testing: Everything You Need To Know
The Multifaceted Legacy Of Sebastian Shaw: A Journey Through His Life And Works
Article Recommendations